
Machine completely dead — no display, no cooling, no response
Crane 497 Refreshment Center Expanded Can
Machine completely dead — no display, no cooling, no response
Systematic check of the power supply chain from wall outlet through the machine's internal protection to the controller.
Qualified technician handoff: stop before live electrical testing, sealed-system refrigeration work, compressor service, or protected-compartment access unless a qualified technician is handling the work.
- repeated-fuse-failure: stop-and-investigate-root-cause
- live-voltage-diagnostic-uncertain: stop-and-escalate
Checklist
Guided Diagnostic Steps
Work from low-risk checks toward technician-level inspection only when evidence supports it.
You can read or print the route now. The first checkbox click opens the service contact gate.
- 1
Verify wall outlet power
operator-intermediatelowUse an outlet tester or plug in a known-good device to confirm the wall outlet is live and wired correctly.
Outlet TesterExpected: Outlet shows correct wiring pattern on tester.
Evidence to note: note
- 2
Check internal fuse or circuit breaker
operator-intermediatehighWith machine unplugged, locate the main fuse or breaker. Inspect for blown fuse or tripped breaker. If fuse is blown, do not replace and re-energize until cause is investigated.
Flashlight or Work LightStop conditions- fuse-blown-without-obvious-cause
Expected: Fuse is intact or breaker is in ON position.
Evidence to note: photo
- 3
Verify voltage reaching controller
technician-advancedlive-voltageWith appropriate PPE, measure voltage at the controller power input terminals. Compare to nameplate rating.
Qualified technician handoff: stop before live electrical testing, sealed-system refrigeration work, compressor service, or protected-compartment access unless a qualified technician is handling the work.
Digital MultimeterStop conditions- burning-smell
- visible-damage
Expected: Voltage within manufacturer specification at controller terminals.
Evidence to note: meter-reading
- 4
Wall outlet problem identified
operator-intermediatelowThe wall outlet is not supplying power or is incorrectly wired. Contact building facilities or a licensed electrician.
Expected: Outlet repaired or alternate circuit used.
Evidence to note: note
- 5
Power cord damage found
operator-intermediatehighDo not plug in a damaged cord. Replace the power cord with a manufacturer-approved equivalent before energizing.
Expected: New cord installed per manufacturer instructions.
Evidence to note: photo
- 6
Investigate blown fuse root cause
technician-advancedhighDo not simply replace the fuse. Inspect wiring harness, controller board, and all powered components for signs of short circuit, water intrusion, or component failure. Repair root cause first.
Digital MultimeterFlashlight or Work LightStop conditions- no-obvious-cause-found
Expected: Root cause of overcurrent identified and repaired.
Evidence to note: photo
- 7
Check harness from power input to controller
operator-intermediatehighUnplug machine. Trace and inspect the wiring from the power input area to the controller board connector. Look for disconnected, corroded, or burned terminals.
Flashlight or Work LightExpected: Harness intact, terminals clean and fully seated.
Evidence to note: photo
- 8
Repair harness connection
operator-intermediatehighClean, reseat, or replace the damaged terminal or wire. Use manufacturer-compatible connectors only.
Digital MultimeterExpected: Secure electrical path restored.
Evidence to note: meter-reading
- 9
Controller diagnostic check
operator-intermediatehighWith power verified reaching the controller, check if display shows any activity. If controller has diagnostic LEDs, note their pattern. If display remains completely blank with known-good power, the controller or display module may require service.
Flashlight or Work LightExpected: Display shows content or diagnostic LED indicates controller activity.
Evidence to note: note
- 10
Controller may need service or replacement
technician-advancedhighPower is confirmed reaching the controller but no output is observed. Before replacing, verify all harness connectors on the controller are properly seated and check for display module harness issues.
Flashlight or Work LightExpected: Either display harness issue found and resolved, or controller confirmed faulty.
Evidence to note: note
- 11
Hand off to licensed electrician or qualified technician
manufacturer-or-licensedlicensed-onlyStop. The issue involves building wiring, uncertain voltage measurements, or damage beyond safe field repair. Contact a licensed professional.
Expected: Qualified professional resolves the issue.
Evidence to note: meter-reading
- 12
Hand off to qualified service technician
technician-advancedhighStop. This diagnosis has reached a point requiring advanced troubleshooting or manufacturer support. Document all findings so far for the technician.
Expected: Advanced technician resolves using specialized tools or manufacturer guidance.
Evidence to note: note
Tools for this route
Location Help
Where to find this
Use this as orientation before touching the machine. It is location help, not a repair instruction.
Start at the front door payment column; match the display, keypad, coin, bill, or card device to the symptom before opening deeper panels.
- Routes and protects main electrical supply to the vending machine.
- power-cord
- main-fuse-or-breaker
- line-filter
Do not open energized or protected electrical areas unless a qualified technician or licensed electrician is handling the work.
cabinet glass front control board generic
 payment column
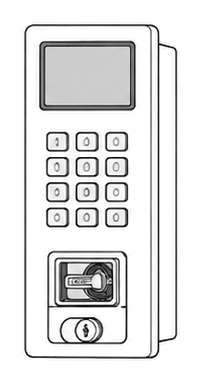 display keypad
Parts status
Exact public parts list not verified yet. Use this route to identify the system before ordering.
Candidate areas for part verification
Other Possible Issues
Switch routes if this symptom is not the closest match.