
Basic No-Cooling Diagnostic
Dixie-Narco DNCB 368MC
Basic No-Cooling Diagnostic
Step-by-step approach to identify why the machine is not cooling, starting from safe visual checks and progressing only as evidence warrants.
Qualified technician handoff: stop before live electrical testing, sealed-system refrigeration work, compressor service, or protected-compartment access unless a qualified technician is handling the work.
Checklist
Guided Diagnostic Steps
Work from low-risk checks toward technician-level inspection only when evidence supports it.
You can read or print the route now. The first checkbox click opens the service contact gate.
- 1
Verify Machine Has Power
operator-intermediatelowConfirm the display is active and the interior light turns on when door is opened. If no display, route to display-blank flow.
Qualified technician handoff: stop before live electrical testing, sealed-system refrigeration work, compressor service, or protected-compartment access unless a qualified technician is handling the work.
Stop conditions- No power to machine — must resolve before refrigeration diagnostic
Expected: Display shows pricing or temperature. Interior light illuminates.
Evidence to note: photo
- 2
Check Condenser and Evaporator Fan Operation
operator-intermediatehighWith machine powered and calling for cooling, observe whether the condenser fan (near compressor at bottom/rear) and evaporator fan (inside cabinet near cooling coil) are both spinning freely.
Qualified technician handoff: stop before live electrical testing, sealed-system refrigeration work, compressor service, or protected-compartment access unless a qualified technician is handling the work.
Flashlight or Work LightStop conditions- Fan blade obstructed — clear obstruction before running
Expected: Both fans spin smoothly without unusual noise.
Evidence to note: photo
- 3
Check Condenser Coil Airflow
operator-intermediatelowVisually inspect the condenser coil for heavy dust, lint, or debris buildup. A blocked coil cannot reject heat effectively.
Qualified technician handoff: stop before live electrical testing, sealed-system refrigeration work, compressor service, or protected-compartment access unless a qualified technician is handling the work.
Flashlight or Work LightExpected: Condenser coil fins are visible and mostly clear of debris.
Evidence to note: photo
- 4
Clean Condenser Coil
operator-intermediatelowWith power disconnected, gently brush or vacuum the condenser coil fins to remove accumulated dust and debris. Take care not to bend the delicate fins.
Qualified technician handoff: stop before live electrical testing, sealed-system refrigeration work, compressor service, or protected-compartment access unless a qualified technician is handling the work.
Coil Cleaning BrushShop VacuumStop conditions- Fins damaged or coil leaking — sealed system issue, escalate to manufacturer-or-licensed
Expected: Coil is visibly clean with open airflow passages.
Evidence to note: photo
- 5
Check Door Seal Integrity
operator-intermediatelowClose the door on a thin piece of paper at several points around the perimeter. The paper should be gripped firmly. Test especially at corners.
Expected: Paper is held snugly at all test points with no gaps.
Evidence to note: note
- 6
Verify Thermostat or Temperature Setting
operator-intermediatelowConfirm the thermostat or electronic temperature control is set to an appropriate cooling range. If adjustable, note the current setting.
Expected: Temperature control is in normal cooling range.
Evidence to note: photo
- 7
Listen for Compressor Activity
operator-intermediatehighWith the machine calling for cooling, listen near the compressor area. Note whether the compressor is running, humming, clicking, or silent.
Qualified technician handoff: stop before live electrical testing, sealed-system refrigeration work, compressor service, or protected-compartment access unless a qualified technician is handling the work.
Stop conditions- Loud mechanical clanking or grinding — stop and escalate
Expected: Compressor runs with a steady low hum and slight vibration.
Evidence to note: note
- 8
Retest Cooling After Condenser Cleaning
operator-intermediatelowRestore power and allow the machine to run for 15-30 minutes. Check if product temperature begins to decrease.
Qualified technician handoff: stop before live electrical testing, sealed-system refrigeration work, compressor service, or protected-compartment access unless a qualified technician is handling the work.
Thermometer (IR or Probe)Expected: Product temperature starts dropping within 30 minutes.
Evidence to note: meter-reading
Tools for this route
Location Help
Where to find this
Use this as orientation before touching the machine. It is location help, not a repair instruction.

Start with exterior airflow, door seal, and temperature-setting checks; treat the lower refrigeration compartment as technician-led.
- Provides electrical connection from facility to machine.
- Power cord
- Terminal block
- Line fuse or breaker
Do not open energized or protected electrical areas unless a qualified technician or licensed electrician is handling the work.
cabinet drink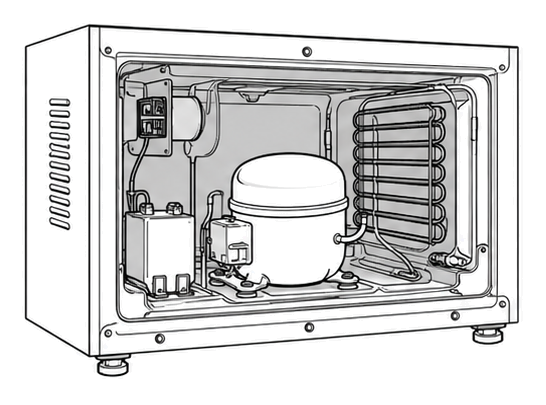 refrigeration bay
 power supply
 terminal block
Parts status
Exact public parts list not verified yet. Use this route to identify the system before ordering.
Candidate areas for part verification
Other Possible Issues
Switch routes if this symptom is not the closest match.