
Diagnose Continuous Refrigeration Run
USI USI 3155
Diagnose Continuous Refrigeration Run
Systematic evaluation of a refrigeration system that will not cycle off, covering airflow, door seal, temperature sensor, relay, and sealed-system possibilities in order of likelihood and safety.
Qualified technician handoff: stop before live electrical testing, sealed-system refrigeration work, compressor service, or protected-compartment access unless a qualified technician is handling the work.
- Compressor casing too hot to touch for more than 3 seconds: stop-and-escalate
- Any refrigerant oil visible at fittings or on cabinet floor: stop-and-escalate
Checklist
Guided Diagnostic Steps
Work from low-risk checks toward technician-level inspection only when evidence supports it.
You can read or print the route now. The first checkbox click opens the service contact gate.
- 1
Check Load Condition and Ambient Environment
operator-intermediatesafe-visualDetermine whether the machine was recently stocked with a large volume of warm product. Note the approximate ambient room temperature and whether the location has unusual heat sources (direct sunlight, kitchen equipment, etc.). Observe whether the unit has been running for less than 2 hours since loading.
Expected: If the machine was recently loaded with warm product, extended run time is expected behavior. If ambient conditions exceed the manufacturer's rated operating range, the extended run may be environmental.
Evidence to note: meter-reading
- 2
Inspect Door Gasket and Seal Integrity
operator-intermediatesafe-visualClose the door on a dollar bill or thin paper strip at several points around the perimeter. The paper should have light, even resistance when pulled. Look for visible gaps, cracks, hardening, or deformation in the gasket material. Check that the door closes fully and the latch engages.
Expected: Gasket grips paper evenly all around. No visible gaps, cracks, or light leaks.
Evidence to note: photo
- 3
Verify Evaporator Airflow Is Unobstructed
operator-intermediatesafe-visualWith the machine running, check that no product or shelving is blocking the airflow path near the evaporator. Confirm the evaporator fan is spinning and producing detectable airflow at the discharge. Look through the interior panel or access area for signs of ice building on the evaporator fins.
Stop conditions- Fan blades hitting ice
- Unusual grinding or screeching from fan motor
Expected: Evaporator fan is spinning. Airflow is detectable. No product blocking the path. Evaporator fins show light even frost or are cold to the touch, not encased in solid ice.
Evidence to note: photo
- 4
Branch: Determine Evaporator Issue Type
operator-intermediatesafe-visualBased on findings from the previous step, categorize the evaporator-side issue: Is the fan not running at all? Is ice blocking the coil? Is the fan running but airflow is blocked by product?
Expected: Issue categorized as: fan-failure, ice-blockage, or product-blockage.
Evidence to note: photo
- 5
Inspect Condenser Coil and Fan
operator-intermediatehighAccess the lower rear or bottom area where the compressor and condenser are located. Visually inspect the condenser coil for dust, lint, or debris buildup. Confirm the condenser fan is running when the compressor is running. Ensure nothing is blocking airflow into or out of the condenser area.
Qualified technician handoff: stop before live electrical testing, sealed-system refrigeration work, compressor service, or protected-compartment access unless a qualified technician is handling the work.
Stop conditions- Compressor too hot to touch
- Visible oil around compressor fittings
Expected: Condenser coil is reasonably clean. Condenser fan is spinning. Airflow is unrestricted.
Evidence to note: photo
- 6
Evaluate Temperature Sensor Signal
technician-advancedtechnician-intermediateLocate the temperature sensor in the return-air path of the refrigerated section. With the machine running, note the display temperature reading. Use a thermometer placed near the sensor location to compare displayed reading to actual temperature. A significant discrepancy suggests sensor or controller issue. Sensor resistance testing requires disconnecting power and measuring at the controller harness connector; expected resistance values requireOfficialSource.
Expected: Display temperature and actual temperature are reasonably close. Sensor is mounted in its correct location in the return-air stream, not dislodged or hanging.
Evidence to note: meter-reading
- 7
Check Refrigeration Relay State
technician-advancedlive-voltageDetermine whether the controller is commanding the compressor on, or whether the relay is stuck closed independently. If safe to do so, disconnect power, wait briefly, restore power, and observe whether the compressor starts immediately before the controller would logically call for cooling. A relay that is stuck mechanically will keep the compressor running regardless of controller command. This step requires understanding of relay circuit topology; if uncertain, hand off.
Qualified technician handoff: stop before live electrical testing, sealed-system refrigeration work, compressor service, or protected-compartment access unless a qualified technician is handling the work.
Stop conditions- Burning smell from relay or controller board
- Visible arc or burn marks on relay or board
Expected: Refrigeration relay responds to controller commands. Compressor starts and stops in coordination with controller cooling calls.
Evidence to note: meter-reading
- 8
Assess Sealed System Possibility
manufacturer-or-licensedlicensed-onlyIf airflow, door seal, condenser cleanliness, temperature sensor, and relay have all checked acceptable and the unit still runs continuously without reaching set point, the possibility of a sealed-system issue (low refrigerant charge or internal restriction) must be considered. Confirm evaporator coil temperature pattern: a partially cold evaporator with a sharp temperature transition may indicate restriction or undercharge. Sealed-system diagnosis and repair is not field-serviceable without EPA certification and manufacturer authorization.
Qualified technician handoff: stop before live electrical testing, sealed-system refrigeration work, compressor service, or protected-compartment access unless a qualified technician is handling the work.
Stop conditions- Refrigerant oil visible
- Frost burn risk from touching frosted lines
Expected: Either a sealed-system symptom is identified (partial coil cooling, oil residue, frost pattern abnormality) or the diagnosis remains inconclusive.
Evidence to note: photo
- 9
Terminal: Extended Run Due to Product Load
operator-intermediatesafe-visualThe continuous run is likely caused by a recent large load of warm product. Allow the machine to run and monitor. It should begin cycling normally once product reaches set temperature. If it does not cycle within a reasonable period (several hours with typical load), re-enter the diagnostic flow.
Expected: Unit begins normal cycling after product temperature stabilizes.
Evidence to note: photo
- 10
Terminal: Replace Door Gasket
operator-intermediatesafe-visualDoor gasket has failed the seal test. Replace the gasket with a compatible part. Verify compatibility by matching the door model and serial range. After replacement, re-test with the paper-tug method and observe cycling behavior.
Expected: New gasket seals evenly. Unit reaches set temperature and cycles off within a normal period.
Evidence to note: photo
- 11
Terminal: Replace Evaporator Fan Motor or Clear Ice
operator-intermediatehighEvaporator fan is not running or is obstructed by ice. If iced, perform a controlled defrost (power off, door open) and re-evaluate fan operation. If the fan motor has failed, replace with a compatible evaporator fan motor. Verify correct rotation direction and airflow after installation.
Expected: Evaporator fan runs freely, airflow is restored, coil defrosts and shows even light frost pattern during normal operation.
Evidence to note: note
- 12
Terminal: Clean Condenser Coil
operator-intermediatesafe-visualCondenser coil was dirty or obstructed. Clean the coil using a coil brush and/or compressed air or vacuum. Ensure condenser fan operates freely after cleaning. Restore power and observe cycling behavior.
Qualified technician handoff: stop before live electrical testing, sealed-system refrigeration work, compressor service, or protected-compartment access unless a qualified technician is handling the work.
Expected: Condenser coil is visibly clean. Compressor runs cooler. Unit reaches set point and cycles off normally.
Evidence to note: photo
Tools for this route
Location Help
Where to find this
Use this as orientation before touching the machine. It is location help, not a repair instruction.
Start at the affected product shelf or selection row; compare the tray, coil, and product path with a nearby working selection.
- Maintains canned-beverage compartment at target temperature through vapor-compression cycle.
- Compressor
- Condenser coil and fan
- Filter-drier
Do not open sealed-system or compressor areas unless a qualified refrigeration technician is handling the work.
cabinet glass front spiral coil
 delivery bin sensor
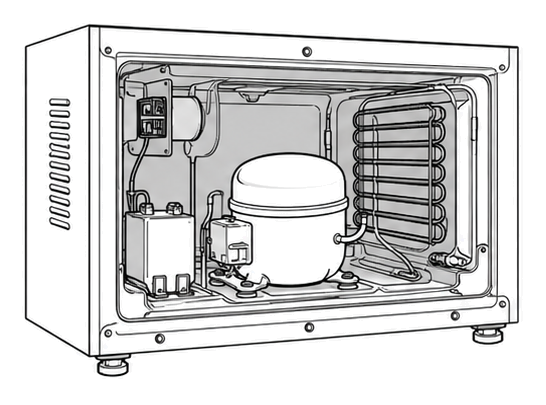 refrigeration bay
Parts status
Exact public parts list not verified yet. Use this route to identify the system before ordering.
Candidate areas for part verification
Other Possible Issues
Switch routes if this symptom is not the closest match.