
Blank Display Diagnostic
VendnetUSA Model 3004
Blank Display Diagnostic
Systematic check of display operation starting from safe external observation and progressing to internal checks only when warranted by evidence.
Qualified technician handoff: stop before live electrical testing, sealed-system refrigeration work, compressor service, or protected-compartment access unless a qualified technician is handling the work.
Checklist
Guided Diagnostic Steps
Work from low-risk checks toward technician-level inspection only when evidence supports it.
You can read or print the route now. The first checkbox click opens the service contact gate.
- 1
Confirm overall machine power state
owner-basiclowWith the machine closed, observe if interior lighting is visible through any openings. Listen for fan noise or any hum indicating the machine is powered.
Stop conditions- Burning smell detected
Expected: Determination of whether the entire machine is without power or only the display is affected.
Evidence to note: photo
- 2
Check power source externally
owner-basiclowVerify the wall outlet functions using a known-good device. If the outlet is dead, contact facility maintenance. Do not open the machine.
Stop conditions- Damaged power cord visible
- Scorch marks on outlet
Expected: Confirmed working or non-working wall outlet.
Evidence to note: photo
- 3
Open door and inspect display harness connections
operator-intermediatemediumWith power still on, carefully open the outer door. Inspect the display module harness connection for looseness, corrosion, or obvious damage. Do not disconnect anything yet.
Stop conditions- Signs of burning or melting on harness
- Water present near connections
Expected: Visual assessment of harness condition and seating.
Evidence to note: photo
- 4
Check low-voltage supply to display
technician-advancedmediumWith the machine unplugged, locate the display harness connector. Plug the machine back in and carefully measure the DC voltage at the display power input. Compare to expected value.
Stop conditions- Unexpected voltage on what should be a low-voltage circuit
Expected: Voltage reading that confirms or denies power delivery to the display.
Evidence to note: meter-reading
- 5
Reseat display harness
owner-basiclowUnplug the machine. Disconnect and reconnect the display harness, ensuring firm seating. Restore power and check display.
Expected: Display illuminates after reseating.
Evidence to note: note
- 6
Trace low-voltage supply upstream
technician-advancedmediumCheck the low-voltage power supply output at the power supply board. This determines if the issue is the supply or the harness between supply and display.
Stop conditions- Signs of component failure on power supply board
Expected: Voltage reading confirming power supply output status.
Evidence to note: meter-reading
- 7
Display replacement indicated
operator-intermediatelowPower and harness confirmed good but display is non-functional. A display module replacement is indicated after completing all replacement guards.
Expected: Terminal: display replacement required.
Evidence to note: note
- 8
Escalate to qualified technician
owner-basiclowFurther diagnosis requires advanced electrical testing or sealed-system access beyond current scope. Secure the machine and escalate.
Qualified technician handoff: stop before live electrical testing, sealed-system refrigeration work, compressor service, or protected-compartment access unless a qualified technician is handling the work.
Expected: Terminal: safe handoff.
Evidence to note: note
- 9
Wall outlet issue confirmed
owner-basiclowThe wall outlet is non-functional. This is a facility electrical issue. Contact building maintenance.
Expected: Terminal: external power issue identified.
Evidence to note: note
- 10
Harness fault between PSU and display
operator-intermediatemediumPower supply output is good but display shows no voltage. The harness or connectors between PSU and display have a fault. Inspect and repair harness.
Expected: Terminal: harness fault identified.
Evidence to note: meter-reading
- 11
Power supply unit fault
technician-advancedmediumPower supply is not producing expected low-voltage output. PSU replacement may be indicated after completing replacement guards.
Expected: Terminal: PSU fault identified.
Evidence to note: meter-reading
- 12
Issue resolved or terminal state reached
owner-basiclowDocument the findings and actions taken. If the issue is resolved, verify display shows correct information and test a vend cycle.
Expected: Documented outcome.
Evidence to note: note
Tools for this route
Location Help
Where to find this
Use this as orientation before touching the machine. It is location help, not a repair instruction.

Start at the front door payment column; match the display, keypad, coin, bill, or card device to the symptom before opening deeper panels.
- Shows pricing, credit amounts, and selection information to customers; accepts product selection input
- digital-display
- selection-buttons
- keypad-membrane
cabinet generic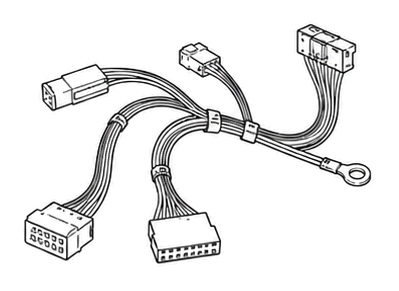 wiring harness
 payment column
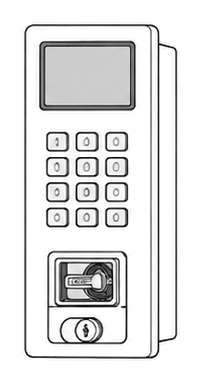 display keypad
Parts status
Exact public parts list not verified yet. Use this route to identify the system before ordering.
Candidate areas for part verification
Other Possible Issues
Switch routes if this symptom is not the closest match.