
Single Motor Diagnostic Flow
Merchant Series 948 949
Single Motor Diagnostic Flow
This procedure guides you through troubleshooting issues related to a single product selection motor, which is crucial for dispensing items correctly.
- Burning smell from motor area: Stop immediately and unplug machine.
- If the issue persists after these steps, or if advanced controller diagnostics are necessary, you must escalate this to a qualified technician for further assessment and repair.
Checklist
Guided Diagnostic Steps
Work from low-risk checks toward technician-level inspection only when evidence supports it.
You can read or print the route now. The first checkbox click opens the service contact gate.
- 1
Visually confirm the product tray is seated flush and the main power...
operator-intermediatelowVisually confirm the product tray is seated flush and the main power connection is secure.
Stop conditions- If the issue persists after these steps, or if advanced controller diagnostics are necessary, you must escalate this to a qualified technician for further assessment and repair.
Expected: Initial condition is documented before deeper diagnosis.
Evidence to note: note
- 2
Manually inspect the selected product column for any visible signs of...
operator-intermediatelowManually inspect the selected product column for any visible signs of obstruction or product jamming.
Stop conditions- If the issue persists after these steps, or if advanced controller diagnostics are necessary, you must escalate this to a qualified technician for further assessment and repair.
Expected: Initial condition is documented before deeper diagnosis.
Evidence to note: note
- 3
Ensure the product tray is resting flat on the support rails and full...
operator-intermediatelowEnsure the product tray is resting flat on the support rails and fully pushed back.
Stop conditions- If the issue persists after these steps, or if advanced controller diagnostics are necessary, you must escalate this to a qualified technician for further assessment and repair.
Expected: Result is documented before continuing the route.
Evidence to note: note
- 4
Lift the front of the tray slightly to disengage the rollers, push th...
operator-intermediatelowLift the front of the tray slightly to disengage the rollers, push the tray fully backward, and then lower the front onto the rails.
Stop conditions- If the issue persists after these steps, or if advanced controller diagnostics are necessary, you must escalate this to a qualified technician for further assessment and repair.
Expected: Result is documented before continuing the route.
Evidence to note: note
- 5
Examine the selected column for products caught in the spiral, hangin...
operator-intermediatelowExamine the selected column for products caught in the spiral, hanging off the edge, or wedged against the glass.
Stop conditions- If the issue persists after these steps, or if advanced controller diagnostics are necessary, you must escalate this to a qualified technician for further assessment and repair.
Expected: Result is documented before continuing the route.
Evidence to note: note
- 6
Carefully rotate the spiral by hand to back out or dislodge the jamme...
operator-intermediatelowCarefully rotate the spiral by hand to back out or dislodge the jammed product.
Stop conditions- If the issue persists after these steps, or if advanced controller diagnostics are necessary, you must escalate this to a qualified technician for further assessment and repair.
Expected: Result is documented before continuing the route.
Evidence to note: note
- 7
Disconnect power
operator-intermediatelowDisconnect power
Stop conditions- If the issue persists after these steps, or if advanced controller diagnostics are necessary, you must escalate this to a qualified technician for further assessment and repair.
Expected: Result is documented before continuing the route.
Evidence to note: note
- 8
Access the wiring harness connecting the specific motor to the tray p...
operator-intermediatelowAccess the wiring harness connecting the specific motor to the tray plug for a qualified technician.
Stop conditions- If the issue persists after these steps, or if advanced controller diagnostics are necessary, you must escalate this to a qualified technician for further assessment and repair.
Expected: Result is documented before continuing the route.
Evidence to note: note
- 9
Check for continuity and secure connections
operator-intermediatelowCheck for continuity and secure connections
Stop conditions- If the issue persists after these steps, or if advanced controller diagnostics are necessary, you must escalate this to a qualified technician for further assessment and repair.
Expected: Result is documented before continuing the route.
Evidence to note: note
- 10
Replace the faulty motor with a compatible component according to the...
operator-intermediatelowReplace the faulty motor with a compatible component according to the manufacturer's guidelines.
Stop conditions- If the issue persists after these steps, or if advanced controller diagnostics are necessary, you must escalate this to a qualified technician for further assessment and repair.
Expected: Result is documented before continuing the route.
Evidence to note: note
Tools for this route
Location Help
Where to find this
Use this as orientation before touching the machine. It is location help, not a repair instruction.
Start at the affected product shelf or selection row; compare the tray, coil, and product path with a nearby working selection.
- Holds inventory and spaces items correctly for accurate dispensing.
- Shelving rails
- Product trays
- Spacing adjustments
cabinet glass front display keypad
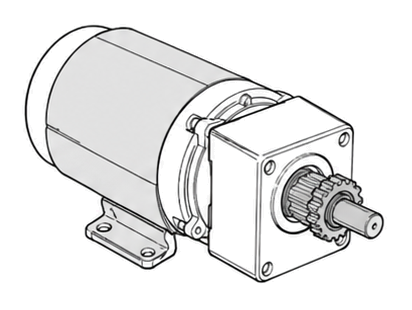 vend motor
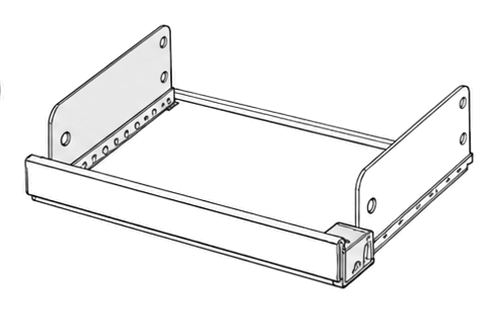 tray shelf
Parts status
Exact public parts list not verified yet. Use this route to identify the system before ordering.
Candidate areas for part verification
Other Possible Issues
Switch routes if this symptom is not the closest match.