
Refrigeration Not Cooling - Basic Diagnostic
Royal Vendors RVV NG Vender
Refrigeration Not Cooling - Basic Diagnostic
Non-invasive and basic diagnostic steps for insufficient cooling, covering airflow, cleanliness, door seal, and compressor run-state. Does not cover sealed-system work.
Qualified technician handoff: stop before live electrical testing, sealed-system refrigeration work, compressor service, or protected-compartment access unless a qualified technician is handling the work.
- Oil residue found indicating potential refrigerant leak: Stop all work on sealed system. Tag machine.
- Compressor knocking, grinding, or making unusual mechanical noise: Power down compressor immediately to prevent further damage.
Checklist
Guided Diagnostic Steps
Work from low-risk checks toward technician-level inspection only when evidence supports it.
You can read or print the route now. The first checkbox click opens the service contact gate.
- 1
Measure Internal Temperature
operator-intermediatelowPlace a thermometer in the center of the cabinet. Allow time to stabilize if door was recently opened. Record the reading.
ThermometerExpected: Temperature is within expected range for the product being vended.
Evidence to note: meter-reading
- 2
Check Door Seal
operator-intermediatelowClose the door on a thin piece of paper at several points around the perimeter. The paper should be gripped firmly by the gasket all around. Also visually inspect the gasket for tears, permanent deformation, or dirt.
Expected: Paper is held firmly at all test points around the door perimeter.
Evidence to note: photo
- 3
Inspect and Clean Condenser Coil
operator-intermediatelowAccess the condenser coil area (typically at the bottom or rear of the machine). Inspect for dust, debris, and airflow obstruction. Clean gently with a coil brush and vacuum if accessible.
Qualified technician handoff: stop before live electrical testing, sealed-system refrigeration work, compressor service, or protected-compartment access unless a qualified technician is handling the work.
Flashlight or Work LightCondenser Coil BrushStop conditions- Oil residue around condenser or compressor connections
Expected: Condenser coil is clean with unrestricted airflow.
Evidence to note: photo
Tools for this route
Location Help
Where to find this
Use this as orientation before touching the machine. It is location help, not a repair instruction.
Start at the customer delivery bin and product drop path; clear visible product and debris before moving to internal checks.
- Maintains internal cabinet temperature within target range for product quality.
- Compressor
- Condenser coil and fan
- Evaporator coil and fan
Do not open sealed-system or compressor areas unless a qualified refrigeration technician is handling the work.
cabinet glass front spiral coil
 delivery bin sensor
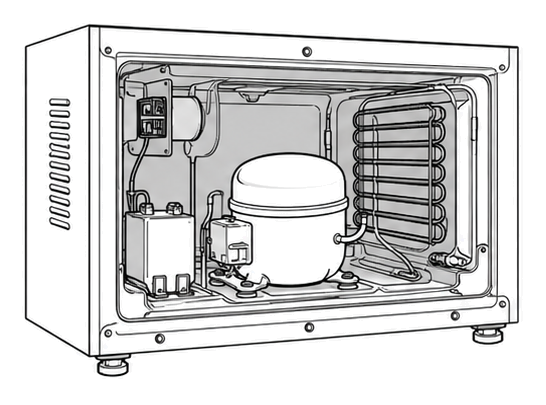 refrigeration bay
Parts status
Exact public parts list not verified yet. Use this route to identify the system before ordering.
Candidate areas for part verification
Other Possible Issues
Switch routes if this symptom is not the closest match.